3. Software and services
The IAM.AMR project relies heavily on free and open-source software. The authors would like to thank the developers that made these projects possible, and recognize the companies which provide paid or closed-source software and services at a discount for academic users.
For more information on free and/or open-source projects, see the Open Source Initiative and the Free Software Foundation.
3.1. List of software and services
- Analytica
- “Analytica is a visual software package developed by Lumina Decision Systems for creating, analyzing and communicating quantitative decision models.”
- Git
- “Git is a distributed version-control system for tracking changes in source code during software development.”
- GitHub
- “GitHub Inc. is a web-based hosting service for version control using Git.”
- Kumu
- “Kumu is a powerful data visualizatiuon platform that helps you organize complex information into interactive relationship maps.”
- Let’s Encrypt
- “Let’s Encrypt is a free, automated, and open certificate authority.”
- Mendeley
- “Mendeley is a desktop and web program produced by Elsevier for managing and sharing research papers, discovering research data and collaborating online.”
- R
- “R is a programming language and free software environment for statistical computing and graphics supported by the R Foundation for Statistical Computing. The R language is widely used among statisticians and data miners for developing statistical software and data analysis.”
- RStudio
- “RStudio is a free and open-source integrated development environment for R, a programming language for statistical computing and graphics.”
- Read the Docs
- “Read the Docs is a software documentation hosting platform.”
- Sphinx
- “Sphinx is a tool that makes it easy to create intelligent and beautiful documentation, written by Georg Brandl and licensed under the BSD license.”
3.3. Install software using “extract-and-run”
Sometimes, installation of software may fail (e.g., due to lack of administrative rights). As an alternative to using the installer, many programs can be run “portably” via “extract-and-run”.
“Extract-and-run” involves the use of an unarchiver (e.g., 7-Zip) to extract the program files from the installer to a location of your choice. The program is not installed in the traditional sense (it won;t appear in your start menu), but a shortcut can be created on your desktop directly to the program’s .exe.
The following instructions use the C:/myprograms directory, but you can use any local writiable directory (e.g., C:/Users/My Username/My Desktop).
Warning
The Government of Canada’s Acceptable Use Policy states that the installation of unapproved software on a government device is prohibited. Proceed at your own risk.
3.3.1. Mendeley
- Download the latest version of Mendeley here.
- Right-click on the installer and select ‘7-Zip > Extract to “Mendeley-Desktop-###-win32”’. This will create a new folder in your current directory.
- Navigate to the root of your C:/ drive, and if it doesn’t already exist, create a new folder called ‘myprograms’.
- Move the folder you created in step 2 into the myprograms folder.
- Navigate to the folder (within C:/myprograms/), and locate the ‘MendeleyDesktop.exe’ executable. Right-click on MendeleyDesktop.exe and select ‘Send to > Desktop’ to create a shortcut.
- Launch Mendeley from your newly created shortcut.
3.3.2. R and R Studio
3.3.2.1. Install R
- Download the latest version of R from the University of Toronto here.
- Navigate to the root of your C:/ drive, and if it doesn’t already exist, create a new folder called ‘myprograms’.
- Run the installer and select your preferred language.
- When prompted, click ‘Next’ to acknowledge the warning about administrator privileges, and ‘Next’ to accept the licensing agreement.
- Now, select a destination location by using ‘Browse’. Navigate to and select the ‘myprograms’ folder, in the root of your C:/ directory. The installer will automatically append a folder name to this path, according to the R version number. Click ‘Next’.
- Click ‘Next’ on all subsequent screens to accept the default installation options, and complete the installation.
3.3.2.2. Install RStudio
- Download the latest zipped version of RStudio from the downloads page.
Tip
Ensure you download the Windows Vista/7/8/10 zip file, not the .exe installer. These are located under the Zip/Tarball heading.
- Right-click on the zip file and select ‘Extract All’. This will create a new folder in your current directory.
- Navigate to the root of your C:/ drive, and if it doesn’t already exist, create a new folder called ‘myprograms’.
- Move the folder you created in step 2 into the myprograms folder.
- Navigate to the folder (within C:/myprograms/), and locate the ‘rstudio.exe’ exexutable within the ‘bin’ folder. Right-click ‘rstudio.exe’, and select ‘Send to > Desktop’ to create a shortcut.
- Launch RStudio from your newly created shortcut.
3.3.2.3. Select a R Installation (optional)
Where multiple versions of R are available, or where the installation has not successfully been added to the registry, it may be necessary to select the appropriate (usually the latest) version of R.
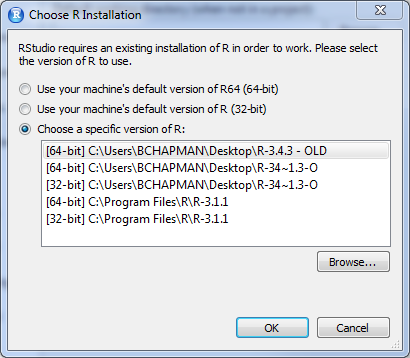
The RStudio R installation selection window.
If you are prompted during RStudio’s installation, choose the most appropriate version of R from the ‘Choose a specific version of R’ dropdown. If there are none listed, use ‘Browse…’ to navigate to the ‘bin’ sub-directory of your installation, and select ‘R.exe’.
If you have multiple versions of R installed and you would like to choose a different version after RStudio has been installed, you can make the selection from Tools > Global Options.
3.4. Zotero
3.4.1. Fix Zotero plugin missing from Microsoft Word ribbon
The Zotero ribbon will not appear by default on GoC PCs, because of the softwarepoliciesmicrosoftoffice14.0commontoolbarswordnoextensibilitycustomizationfromdocument GPO. To replace the toolbar manually, follow the steps in Word below:
- Left click on the File tab.
- Left click on Options.
- Left click on “Customize Ribbon”
- Right click on “References”
- Left click on “Add New Group”
- Right click on “New Group (Custom)”
- Left click on “Rename”, and rename the group “Zotero”
- Left click on “Choose commands from:”
- Left click on “Macros”
- Left click on “Project.Zotero.ZoteroAddNote” (the first item in the list)
- Double left click on “Add” button repeatedly, until all Zotero macros are in the new Zotero group
12. Left click on “OK (Button)” 13.